Make your own Wavebox
Page 1 of 1

 Make your own Wavebox
![]() reefkeepersni Tue Jan 18, 2011 10:54 pm
reefkeepersni Tue Jan 18, 2011 10:54 pm
In this thread, I will share with you guys how to construct your own DIY wavebox. First of all, you will need to own the following components before starting this project.
You will need a controllable tunze turbelle stream pump either 6000, 6100 or 6200. The flowrate does not matter as 6000 is good enough for wavemaking.
You will also need a 6080.50 magnet holder. This magnet holder will be able to support the wavebox up to 15mm glass thickness.
Soldering stuff (not really necessary but good to have)
Breadboard (For those that cant solder)
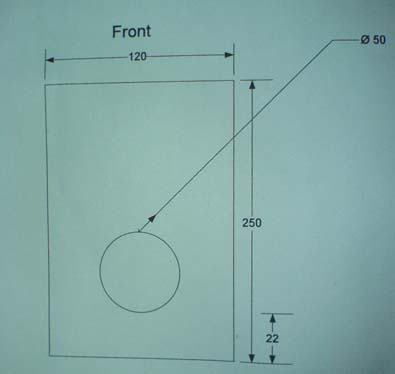
1- You will need to construct a acrylic box with the dimension of 120mm X 140mm X H250mm. You can choose to use any color but I chose to use black.
You will need to drill a hole of 50mm, note that this is a very tight fit. If the hole is out of dimension, either your tunze will shake or you can't fit it in.
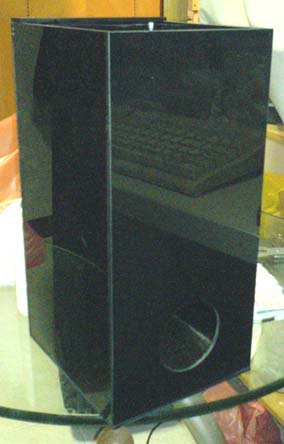
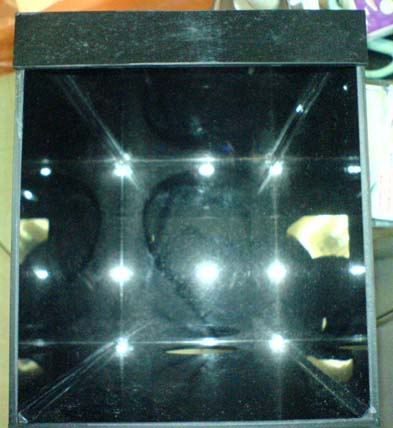
2- Here's the look of the acrylic box. Use the thinnest acrylic available, I'm using 3mm. This acrylic box will hold a tunze stream with a 6080.50 magnet at the back. You will need to insert the pump nozzle down first. Notice the top brace is added to prevent the magnet from sliding out of the box.
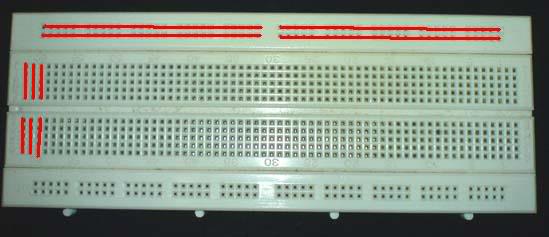
3- Here's the breadboard. Basically its a test board with alot of holes for component testing. The breadboard is connected in 2 directions, I have drawn red lines over them to further enhance the understanding.
All the holes along the red lines are connected together.
4- This is the layout of the DIN 5 male socket which will be connected behind the blue box driver. Note that the pins are facing you.

5- We are going to use the IC 555 which is a general purpose timer. This is the pin configuration of IC 555.
6- Here is the circuit diagram. Please note that I re-arranged the pins to make the diagram easier to read. Always connect the diagram using the pin configuration shown above.
All 3 pins will go into the DIN 5 male connector again please note the correct layout of the DIN 5 connector. The pins shown are facing you.
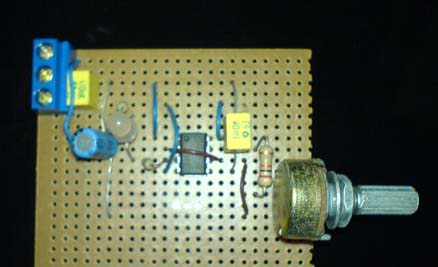
7- I used to solder them but you will need to be quick inorder not to burn the components. You should buy the IC holder and NOT TO solder the IC directly, most likely you will burn the IC.
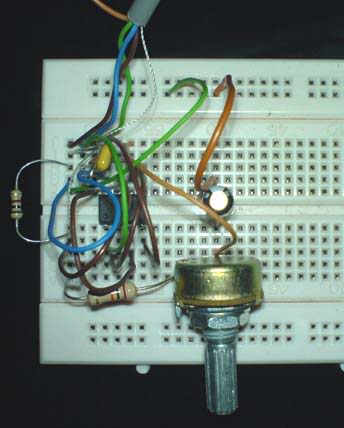
8- Until lately, I found out that 1 of the capacitor is not functioning properly. I decided to use breadboard to temporary fix it, now its semi permanent.
Breadboard is good as its completely reversable and no soldering skills required. If you connect wrongly, you can just pull out and replace it. Good Luck!
I would like to thank BarraCuda for sharing this great build with Us.
You will need a controllable tunze turbelle stream pump either 6000, 6100 or 6200. The flowrate does not matter as 6000 is good enough for wavemaking.
You will also need a 6080.50 magnet holder. This magnet holder will be able to support the wavebox up to 15mm glass thickness.
Soldering stuff (not really necessary but good to have)
Breadboard (For those that cant solder)
1- You will need to construct a acrylic box with the dimension of 120mm X 140mm X H250mm. You can choose to use any color but I chose to use black.
You will need to drill a hole of 50mm, note that this is a very tight fit. If the hole is out of dimension, either your tunze will shake or you can't fit it in.
2- Here's the look of the acrylic box. Use the thinnest acrylic available, I'm using 3mm. This acrylic box will hold a tunze stream with a 6080.50 magnet at the back. You will need to insert the pump nozzle down first. Notice the top brace is added to prevent the magnet from sliding out of the box.
3- Here's the breadboard. Basically its a test board with alot of holes for component testing. The breadboard is connected in 2 directions, I have drawn red lines over them to further enhance the understanding.
All the holes along the red lines are connected together.
4- This is the layout of the DIN 5 male socket which will be connected behind the blue box driver. Note that the pins are facing you.
5- We are going to use the IC 555 which is a general purpose timer. This is the pin configuration of IC 555.
6- Here is the circuit diagram. Please note that I re-arranged the pins to make the diagram easier to read. Always connect the diagram using the pin configuration shown above.
All 3 pins will go into the DIN 5 male connector again please note the correct layout of the DIN 5 connector. The pins shown are facing you.
7- I used to solder them but you will need to be quick inorder not to burn the components. You should buy the IC holder and NOT TO solder the IC directly, most likely you will burn the IC.
8- Until lately, I found out that 1 of the capacitor is not functioning properly. I decided to use breadboard to temporary fix it, now its semi permanent.
Breadboard is good as its completely reversable and no soldering skills required. If you connect wrongly, you can just pull out and replace it. Good Luck!
I would like to thank BarraCuda for sharing this great build with Us.

reefkeepersni- Global Administrator

- Posts : 186
Reputation : 0
Join date : 2010-12-20
Page 1 of 1
Permissions in this forum:
You cannot reply to topics in this forum|
|
|